How-To

Social Media can be ‘Safe for Work’ if…

How many times you have been through this situation? You want to do some ‘real work’ on social networks, maybe send an IM to a co-worker or upload some of your recent work like blog posts, illustration, photos, video etc. or post some work related status. So you log into respective account and before you understand anything you start checking your notifications, news feed and what others have posted. And after 30 mins of scrolling through never-ending stream you realise you have forgotten the reason you logged into your account. You just wasted 30 mins of your time and you have no idea why. I am not just talking about Facebook or Twitter, I am talking about even profession related social networks like Dribbble, Behance, Soundcloud, 500px or even Flickr.

It is a sad truth but social media is really addictive and it is meant to be that way. Each social network creates a habit in you of checking what others are doing, how many likes you have and what not; this is the biggest con of any social network. I am not pessimist about social networks. There is no denial that social network has a lot of potential, it can topple the nation upside down. But as far as we are concerned what we do online is our new resume. Hence it is important to not only to have active social network accounts but your work also should be showcased on appropriate social networks. Let it be Github, Behance or Dribbble, your social profile represents the true talents of yours.

As said earlier, it is easy to get distracted on social networks. But there are some good tools which help you with it especially when you are publishing your work.

1. Buffer — Buffer is the perfect abstraction for your social networking and work. It helps you to share on various social media like Facebook, Twitter, Google+, LinkedIn and App.Net. If you have written a new blog or want to share some images like a photograph or illustration of the latest work; just add them in your Buffer and it will be posted everywhere for you by Buffer. No need to login to social networks just to post it. Great thing about Buffer is, you can even schedule your post on which day and time you want to publish it.

Buffer's browser extension in actionBuffer also provides analytics about Retweets, Favourites, Likes, Shares and Potential Reach, because this is also a primary reason we login to social networks to see how our post is doing.

2. IFTTT — IFTTT means “If This Then That”. Let’s say you have recently created a new sound on Soundcloud then in IFTTT you have to add recipes like “Tweet when new Sound is added” or “Share on Facebook when new Sound is created”. IFTTT provides thousands of such recipes where you have to specify triggers and actions to perform on these triggers.

IFTTT in action

So this way you can connect profession related social networks like 500px, SoundCloud, Behance and when you post your work there, it will be automatically posted to your Twitter, LinkedIn or Facebook Profile/Page.

3. Zapier — Zapier is also similar to IFTTT but Zapier has more app integrations than IFTTT. It includes all apps from social media, email, project management to CRM. It is more focused towards Small and Medium Enterprises rather than consumer. But again it can also help you to automate your work just like IFTTT.

Zapier's SoundCloud-Twitter Zap

On Zapier automated recipes are called as ‘zaps’. Head over to their ‘Zapbook’ to see all the supported services.

With tools like Rapportive, it has become really easy to find all your social network profiles to get the glimpse of who you really are and what you have done. Hence having these automation apps is really crucial. They not only help you to maintain your social media profile but also help you to prevent yourself from getting distracted by constant social network notifications.

These are one of the key principle I keep in mind while building Expojure. We want creative minds like Photographers to publish their work on social media sites like Flickr, Facebook, 500px etc. without getting distracted by activities on social networks. Because such automation apps help us to use social network for the real reason of “Connecting People”, after all this is why Social Networks are built for, right?

Standard
How-To

How to move ‘/home’ to a new partition without re-installing an existing Linux distribution

Having entirely different partition for ‘/home’ is always beneficial. As home is the directory where all your Media and Documents are. By keeping ‘/home’ inside ‘/’ there is a possibility that with switching to new Linux Distro might cause loss of data however in Ubuntu to Ubuntu Switch it does not happen. But if you add a new HDD and wants all your data to be shifted in new Volume it becomes cumbersome to every time to mount and manage the data. So here are some steps which you need to follow to move ‘/home’ to new partition.

Copy your ‘/home’ to new Partition:

Open your Terminal and Run

df -h | grep ^/dev

This will give you list of all the Partitions mounted in. Copy the path of the desired partition (it will be /media/LABEL_NAME). Then copy your home folder to desired partition.

$ sudo rsync -axS --exclude='/*/.gvfs' /home/. /media/LABEL_NAME/.

Reason why we are using ‘rsync’ instead of ‘cp’ to copy the contents is that ‘rsync’ maintains permissions also.

Find out the uuid of the Partition:

UUID stands for Universal Unique Identifier, and every partition has its own uuid.

$ sudo blkid

Blkid

This is will give you output similar to shown in this Snapshot. Copy the UUID of the Partition you want your ‘/home’ to be in and keep in my mind the type of Partition (I.e ext3, ext4, ntfs)

Prepare the switch :

Before moving ahead make sure to take a copy of ‘fstab’. Run-

$ sudo cp /etc/fstab /etc/fstab_bckup

Now open ‘/etc/fstab’ with your favorite text editor

If you are good with vim the do

$ sudo vim /etc/fstab

or do

gksu gedit /etc/fstab

Add following line in fstab-

UUID=????????   /home    TYPE          nodev,nosuid       0       2

where ‘?????’ is the uuid of your partition and type is a type of partition (ext3, ext4 etc.) Save it and close it.

Now you are ready to switch but before that we have taken backup of ‘/home’ and need to empty it.

Follow Sequence of commands –

$ cd /

$ sudo mkdir /home_bckup

$ sudo mv /home /home_bckup

$ cd /

$ sudo mkdir -p /home

Now you have backup of ‘/home’ and ‘fstab’ so its time to reboot. If you have followed instructions properly then next time when Log in everything will be the way you had earlier. Make sure everything is working properly. If you have applications like Dropbox then you might have to reconfigure it (It will be prompted by Dropbox itself) so that Dropbox will re-index your directories.

Standard
How-To

Hacking Tikona WiFi to get WiFi access from Ubuntu

After having dreadful experience with Tikona Customer Care, this morning I registered 4th complaint of this week knowing that there won’t be answer from them nor their ‘Quack Mechanics’ will be able to solve them. So I decided to hack it. After going through various FAQs on Tikona Portal I came to know what is the configuration of it and I finally managed to connect too.

Distro which I’m using is Ubuntu 11.04.

Here are steps  –

Step 1:  

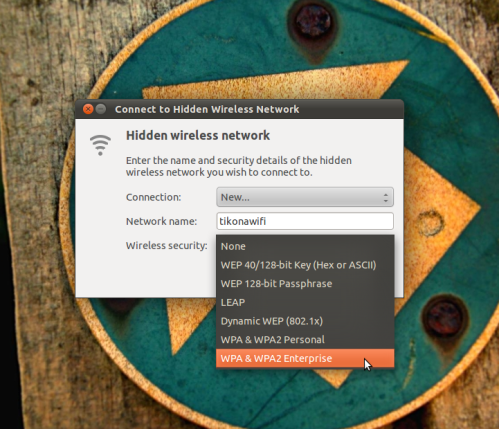
First go to ‘Network Manager’ then click on ‘Connect to Hidden Wireless Network’.

Tikona_hack_1

Step 2: 

Then you will get similar window. Give ‘Network Name’ whatever you want and select ‘Wireless Security’ as ‘WPA and WPA2 Enterprise’ as Tikona uses WPA Encryption. 


Tikona_hack_2


Step 3: 

Then it will open a New Window which will look simlar to below. You have to fill up the details as shown in the snapshot. Select ‘Authentication’ as ‘Tunneled TLS’. Select ‘Inner Authentication’ as ‘MSCHApv2’. Then you have to enter your ‘User Name’ and ‘Password’ provided by Tikona Digital Networks. Once details are filled up as shown in snapshot then hit ‘Connect’.


Tikona_hack-connect_to_hidden_wireless_network3

Step 4: 

After couple of seconds this Notification will appear. Then go to your browser and Normal Login Page will appear which we see while connecting via Ethernet. 

Tikona_hack_-_final
Screenshot-tikona_digital_networks_-_mozilla_firefox


Thats it! Happy Surfing!!


Standard
How-To

Installation of Python 2.5 and Google App Engine in Ubuntu 11.04

If you are planning run Google App Engine Server inside your Ubuntu, It can be a lot of pain in the ass. After tons of searches on Stack Overflow, I didn’t get the proper solution which I wanted. There are different ways to install App Engine Server in your Ubuntu Machine. But most important part is installation of Python 2.5 in the machine and that is the most intricate part. Now I will show you why you need Python 2.5, how to install it and so on….

STEP 1: (Python 2.5 Installation)

Even before starting your App Engine Server there is one important dependency you need to look. i.e. Python 2.5. Google App Engine SDK is compatible with Python 2.5 only. However Ubuntu 11.04 comes with Python 2.7, if you have tried then you will find that Server can run under Python 2.7 environment too. But as the project becomes more complex you will need Python 2.5 otherwise for ‘Hello World’ projects it’s not necessary to have Python 2.5 (according to my experience).

If you are planning to do some ‘sudo apt-get install python2.5’, It won’t work. As Python 2.5 is not present in the latest Ubuntu Repos. It has been removed after release of Ubuntu 9.10.

You can install Python 2.5 by downloading the source code from its website but it does not work for App Engine even though Python 2.5 is present in your machine it will give you error about AttributeError: ‘module’ object has no attribute ‘HTTPSHandler’ . So better solution for that is given by a guy called Felix Krull. He has published newer and older versions of python as PPA. Trust me at one point even I refused to install Thrid Party PPA but I had no other choice. Here are some commands:

sudo add-apt-repository ppa:fkrull/deadsnakes

sudo apt-get update

sudo apt-get install python2.5

Thats it! Now you have Python 2.5 in your machine. You can check it out by running:

python2.5

But however your default python is still python2.7 (run python -V). (If not then read Step 2)

[EDIT] In my earlier post following method was used to replace default python with python2.5 as AppEngine needs Python2.5 as I mentioned earlier. But this may further lead to Broken Applications, ie applications like Software Center, Gwibber, Unity Dash which are dependent on Python2.7 will not work as you have replaced default python with 2.5. So you are supposed to move directly to ‘installation of Google App Engine Step’. However if you want to play with Ubuntu you can view it.

You need to replace that with python2.5. It can be done by creating a new Symbolic Link:

sudo rm /usr/bin/python

sudo ln -s /usr/bin/python2.5 /usr/bin/python

Now you have python2.5 as default python. (Confirm it by python -V)

STEP 2: (Installation of Google App Engine)

This one is the most simplest thing. All you need to do is Download Google Appengine Python SDK extract it where ever you want you will get a directory called ‘google_appengine’. Get the path for ‘google_appengine’ and then run:

$ [path will be here]/google_appengine/dev_appserver.py

You should get a list of all ‘Options’ if you are getting it means App Engine is successfully installed.

Now let us move back to ‘Python2.5’. Even though Python2.5 is installed in your machine AppEngine is not actually using it. As it uses default Python (ie 2.7 in this case). If you are creating simple applications e.g. ‘Hello World’ then App Engine will work but as your application becomes complex App Engine will break as it does not support Python2.7. So to use Python2.5 by AppEngine you have to open dev_appserver.py file in any Editor which will have first line as #!/usr/bin/env python all you have to do is replace it with #!/usr/bin/env python2.5. This will tell AppEngine to use python2.5 as startup environment.

However you will be working with more projects so everytime running

$ [path will be here]/google_appengine/dev_appserver.py [path for the project]

will be time-consuming so this problem can be solved by setting up environment variables.

In this case you need to edit .bashrc file present inside Home Directory (It will be hidden). Run

$vim .bashrc

or

gedit .bashrc

And at the end put ‘export PATH=$PATH:[Your path to]/google_appengine/’. Save it and then confirm it by running ‘echo $PATH’ if you get ‘google_appengine’ path in the end means it has been successfully done. Now instead of running

$ [path will be here]/google_appengine/dev_appserver.py [path for the project]

all you have to do is run :

$ dev_appserver.py [path for the project]
Standard
How-To

Installation of Grub after Windows Installation in Ubuntu 10.04

We all know that, in a machine which is a dual boot (one which has more than one Operating System) its important to have Grub Loader (especially when you have Linux based distro) as Grub is responsible for Switching between the OS. When you have Linux based distro already in your PC but for some reason you also install Windows or Update to Newer Version or Reinstall Windows, it happens that Windows REPLACES Grub Loader from your machine and puts Windows Boot Loader due to which you can’t switch to any of the other Linux based distros. Hence its important to know how to re-install Grub Loader rather than re-installing the distro itself.

Earlier Methods:

In the earlier methods i.e. before Ubuntu 9.10 there was Grub 0.97, but after Ubuntu 9.10 they introduced Grub 1.96.
In the earlier versions it was quite easy to install Grub Loader as you have to type commands such as ‘sudo grub’ which used to take you to grub prompt. Where by giving ‘find /boot/grub/stage1’ you used to give location where exactly grub loader was located and then by ‘root (hd_,1)’ and ‘setup(hd_)’ you were able to get back Grub Loader.
But in Grub 1.97 the method is changed. I tried to find out ‘menu.lst’ and ‘stage1’ files in grub folder but I found that these files are removed and replaced by ‘grub.cfg’. In fact if you run ‘sudo grub’ in any live CD it gives error as ‘Command not Found’, then i tried it by installing via ‘sudo grub-install’ and tried replacing ‘stage1’ by ‘grub.cfg’ ie ‘find /boot/grub/grub.cfg’ but it was not working out. There is a little different way of installing Grub 1.97 in your machine.

Grub 1.97 Installation
Media_http4bpblogspot_vtdjk
If you tried above method then it is recommended to Reboot your machine. And follow the steps given below:-
Media_http2bpblogspot_xsffb
  1. Boot from Live CD (Ubuntu 9.10 or above)
  2. Mount the partition which has ‘Ubuntu Installation’. (Note that it is ‘/’) And once mounted you should see ‘boot’ folder in it.
  3. Get the UUID of the partition. You can get the UUID from ‘/media’. In my case its shown in the image. (You better go to Properties of the partition by right clicking on the partition and then Copy it)
  4. And then open ‘Terminal’ from ‘Applications -> Accessories’.
  5. Then type
    sudo grub-setup -d /media/UUID/boot/grub /dev/sda
  6. Replace UUID with your UUID.
  7. In the above case ‘sda’ and ‘sdb’ will be dependent on where MBR is installed in most of the cases its in ‘sda’.
  8. Reboot it.
  9. BANG!! You will get those OS options again.
Standard